


One of the projects on my 21 in 2021 project list that I was most excited about was #7 "redo a gallery wall". I had a few I was considering and knew I wanted to make ONE of them happen last year so I gave myself the smallest of leeway of said I'd do one of them. (I also ended up tackling a big gallery wall in the boys' room which wasn't on the list but was added to my to do list when we rearranged their room for the bunk bed. That was a really enjoyable project that helped me fulfill a creative itch I didn't even know I had.)
The second big gallery wall that I did after I started being interested in home decor, was this travel wall over our buffet in our front room. That was almost 7 years ago, of 6 years before I actually started to dismantle that wall. I really liked it still but we had been on too many vacations and there wasn't room for a picture from each up there. (Or, a few pictures from each because I decided we needed to represent each of the 4 European countries we visited as well as both Hawaiian islands.) We just out traveled that we had space for on that wall. I was also just interested in something different in that spot since it's a large wall in our most seen room. Something with more white space and maybe less of our faces.
AND, I had also thought for many years that eventually I'd like to do a travel wall up the stairs, thinking we'd do that in our "next house". Then I realized, there was NO reason why I couldn't do it in this house, especially since I never want to move. (I am sticking hard to that stance.) SO, all things were pointing to this is the wall I should redo. Then it just came to the process of actually doing it.

Then I did nothing with this project the whole summer. It took me MONTHS to even take down all the command picture hanging strips that were remaining when I took down the frames. I guess I wanted a safety net? I don't know. But the blank wall we've been living with for months sure looks nicer without those strips!
A week or two after school started again last fall I started laying out the new wall. I knew before I started that this was going to be the most complicated gallery wall I had done. Not only did I have a confined space but there was also the angle of the stairs to deal with. My first attempted with tape measures and eyeballing the angle didn't go well. It's hard!

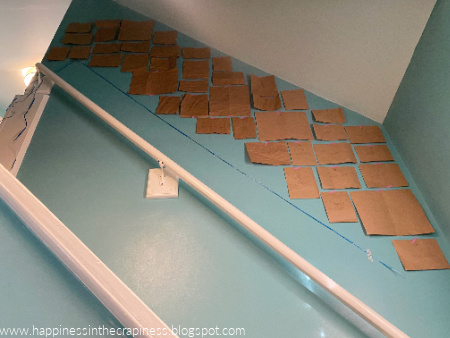
To help with my angle problem I got Matt to help me make a template for the area using my trusted kraft paper. Having that set paper limit to my space really helped me finalize a layout, even if it still took me many more layout attempts and some hard editing to narrow down which pictures and sizes would make the wall.
Part of the balancing was giving 8x10s to our bigger trips, making sure things went to close to chronological order, and trying to balance out the pictures with our faces vs. just scenery. But I also had specific pictures from some trips that I wanted included and sometimes the trips with good family pictures were near each other. It is, by far, the longest I have ever messed with a gallery wall. SO. MANY. ATTEMPTS.

What finally helped me nail it down was, after making a lot of edits, making an arrangement that actually fit most things with room for some more trips and then I left it on the floor for over 24 hours. Right in the middle of our front room. Miraculously, no frames were stepped on and my arrangement mostly stayed as is! Then I had some time to go through some final tweaks and also balance out the frames. My original black, now spray-painted white, frames are chunkier than all the new Target frames I had been buying to fill in with. So once I had my final arrangement I tried to balance those out, where there was space, so all the chunkier frames weren't at the bottom with the skinnier ones at the top. It's not perfect but it's balanced enough that it's not distracting to me!
THEN, it was time to get that sucker up on the wall. I traced ALL THE FRAMES and noted what picture it was, it's orientation and marked where the nail would go. I've been on this zero-waste kick since I did the boys' gallery wall with mostly command strips over the summer so it was back to all nails! Once all the frames were traced I then started taping my guides up on the wall, 4-5 at a time. I frequently ran back to the front room to check on placement as I got the guides on the wall. The paper guides are a bit of a pain BUT I've never regretted doing them, after using them on every large gallery wall I've done in our house. ESPECIALLY on this one, making sure I got the angles right on the stairs.
It was still more than a week until I finally started to put holes in the wall. I am not exaggerating when I say that this was the most time consuming gallery wall I've ever done, by far. I was concerned that my frames were creeping close to the railing as they went up the stairs so I added a ribbon to keep the spacing close to the same, plenty of room for little boys to use the railing without knocking into a bunch of pictures.
After ALL OF THAT. So many layouts, paper guide, hanging them all up, checking my angles and spacing...I FINALLY started to hang frames and that probably took a good 2 hours! I did all the holes except one, first drilling a hole and then pounding in a nail. Not much makes me feel tougher than using a drill, even if it's just putting holes in the wall. I hung frames gradually too, in bunches, as the nails were ready. Even though I traced carefully, I didn't want to get too far and then find out my spacing was off when the actual frames went up.

At this point I still had a picture order I was waiting to be delivered, hence the post-its on some frames. I also knew I wanted to finalize the layout for the vacations not yet taken so I wasn't adding a frame every time we went on a trip and then realize that wasn't the best layout. I actually just finished adding the final frames last week, since I kept buying them all up at my Target (I had shipped some to my earlier in the process and was disgusted with the quantity of packaging materials so I resolved to buy the rest in town as they were in stock).

This project was maybe the longest and most time consuming of any purely decorating project I've done. (Does painting count as decorative? Because painting all the trim in our bedroom white was probably even longer but that's not quite the same thing.) It took A LOT of tries over MANY weeks to get it all figured out. I started in May and finished the following JANUARY. Few of my projects stretch out like that. BUT, it was also, mostly, a delight to do. I missed having so many of our travel pictures displayed and I enjoyed stretching my brain a bit to get it all figured out.
(I'd also like to note that this was a VERY hard space to get pictures of. The stairs are tight and it's pretty much impossible to get the whole thing in one single picture. Also, trying to figure out what the heck counts as "straight" in these stairs was not easy. You might be able to tell why they were a beast to drywall, it was something like 21 different surfaces. That doesn't lend itself to easy picture taking.)


I've also learned that I like the mechanics of managing a project, even one like this. Just keeping it moving and shopping for prints to include and picking our own personal photos to add for recent trips, all the tasks make the end project that much more enjoyable. I wanted a travel gallery wall going up our stairs and now I finally have it! It delights me the many times a day I am going up and down those stairs, to see the photo proof of previous adventures and our boys growing as we go.
Next up, a few frames that used to hang in our stairs are moving to our bedroom (I even used paper guides for that even though it's just a 4 grid!) and then I am going to start working on what is going over the buffet, where many of these pictures once were. It seems like it should be a piece of cake after dealing with the stairs!


No comments:
Post a Comment