Showing posts with label making it pretty. Show all posts

Thursday, September 22, 2022

Double Downstairs Updates

There is something so satisfying about checking off a long percolating project.  Especially when it something in our home that has been staring at me undone for months (or longer).  That's the story behind both of these updates in the downstairs of our home.

Buffet Gallery
For over 6 years, this was our gallery wall over the buffet:


The reveal post was from March 2015 and it mostly stayed like that until May of 2021 when I took it all down (and eventually made a new travel wall on our stairs!).  Then we spent many months with just the command strips up.  Then more months of a completely blank wall.  Then more months of paper guides (back in this post from May you can see paper guides up for an arrangement I didn't end up using.  We had a party with those up.)  Then months of different paper guides.

I knew I wanted a simpler gallery and less on the buffet but it took FOREVER and SO MANY variations, laid out on the floor, to get to what I thought would work.  When Target finally put frames on sale I bought a whole bunch for this and the picture ledges in the kitchen (because I was rearranging those too, as always).  Having that many options to work with as I went over and over this layout really helped me figure out that the solution was LESS frames.  ALWAYS LESS.


Here is where I, finally, ended up although filling the last frame, the lobster one, took me a long time!

The lamp stayed the same and the print over it ("Oh, let's be adventurers darling!") are from 2015.  I didn't want to throw it all out!  And the stack of travel guides next to the Lego flowers are back out, after spending a few years in the buffet.  The rest of the frames are new!  

I knew I wanted this Lindsey Letters print (top middle) and bought that waaaaay back when I first started this process.  I based the wall on that and the Adventurers print since they were the first pieces I had.  

In the bottom middle is a canvas we had printed from a picture we took in Hawaii.  Matt made the frame at least 18 months ago so that's long been part of the process!  

Top left is an IKEA frame and a print from Etsy that I first mentioned back in May.  I liked it as soon as I saw it when browsing for art and like that it's a different medium that anything else up there.  

It was that dang lobster that took forever to figure out.  For awhile Matt was going to make a version of something I had found on Etsy but then we went to Maine and I decided I wanted something Maine related since we loved that trip so much.  I first searched for square pictures of Acadia and almost bought one but then decided it was too similar to the Hawaii picture, despite being almost half a world apart.  But browsing that artist's shop led me to her lobster print.  Going on the lobster and seal watching tour was a real highlight of the trip and it was a nice way to memorialize that but also have a bit of whimsy.  Once I got that print in the mail over the summer this was finally done!

The Lego flowers were a Christmas gift to me from Matt (he picked those out himself!  We don't pick out ALL our own gifts!), in a Target vase I've had a long time.  And the Lego fish tank is a set Luke and I put together together right before he started 3rd grade.  It's my favorite way to have fish in the house!  

Overall, very happy with how this all turned out, even if it took 15 months and A LOT of variations!

The second update was a much quicker one, although one I've been thinking about for awhile.  I wanted more blue in my office, really, that's what it came down to.  Plus, we bought rugs for Matt's office and two for the front room when we redid those floors 5 years ago but I never got one.  And this was easier (although probably more expensive) than repainting my office walls to my current favorite shade of blue (which changes at least once a year.  If you are wondering if my current favorite shade is close to my current favorite sweatshirt...you'd be correct.)

So, I put it on my 22 in 2022 list so I knew I'd make it happen.  Then I debated rugs for a LONG TIME. (the secret theme of this post is "Diana takes forever to make a decision.").  I was semi-set on one we had in a vacation rental years ago but despite contacting the owner, I never found out the make and maker of that rug (I'm sure it was a Wayfair or something similar purchase.)  So then a lot of hemming and hawing, narrowing down, thinking more.  FINALLY (after months) taking measurements of my office (with Sam's help!) to even determine what size I needed...

Then I was set on something blue, darker blue, just really, I needed more shades of blue in my office.  So I forced myself to make a decision and bought this one from Wayfair.  No pad because I didn't want it super soft or thick so my chair could still roll and I knew my heavy desk would keep it in place.  

It arrived a few hours before we left on a weekend camping trip and I even had a spare 10 minutes in frantic packing to unroll it and put heavy books on the corners, in the hope that a weekend of it being unrolled would help it be closer to flat by the time we got home.  Then I took a picture to show Matt and checked that picture more than once over the weekend.  I wasn't completely sold when I unrolled it but by the time we came back home I was.


It does shed but not a ridiculous amount (like one in our front room that made my sister, who knows I am NOT an animal person, ask if we got a cat).  I am always amused when I vacuum to see a layer of blue fuzz in the vacuum in between the white (and dirt) from the very sheddy rug (even after 5 years!).  I can still roll my chair on it easily enough and it still leaves some of my lovely bamboo floor on the edges while also softened (and blue-ing) up my office a bit more.  

Wonderful to finally get both of these checked off the list, especially after months of indecision.  The inbetween can be some work and some thinking and some overthinking but I think that makes actually getting something done all the more enjoyable.  Plus, I like to be sure in my decisions, not impulsive, and what better way to do that than months (and months) of considering options?

Getting these things done has me a bit more motivated to knock out some other lingering house projects.  Some reorganizing, cleaning out, just finishing those nagging tasks.  Always nice to be nagged by them less!

Thursday, May 12, 2022

Sewing a Pennant

One of the items on my 22 in 2022 list was to make a fabric pennant.  I have been on a zero waste kick for almost the past year and, while we have the boys' shared birthday party down to almost zero waste (using reusable dishes/cups/utensils and cloth napkins), the one thing we had been doing was making a balloon garland for the last few years.  It was always very festive and stayed up about 2 months.  This was especially cheery in the early days of the pandemic since we had their party that year the day after Luke's last day of in person school and the balloons stayed up until about the end of that school year.  

So, I wanted a reusable solution and this was the one I came up with.  I intended to have it done for Sam's birthday at the beginning of March but then I put off starting and it ended up just barely being done before their party at the end of the month.  But it did get done!  And it's still up today, nearly 6 weeks later (maybe after school is out I'll take it down?).  There were A LOT of steps but nothing confusing, just took time spread over a month to get it done!

The first step was searching Pinterest for ideas.  I had a general idea of what I was going for but was looking for some guidance.  That led me to this tutorial from The Happy Housie which I basically followed, although mine was significantly longer than hers (my total between three strands is 48 feet.)  I went through my fabric stash and started pulling the blue and green pieces I had that would be big enough.  I also was texting my sewing sister often and she offered some guidance AND some of her fabric scraps.   One the money saving tips she gave me is that, instead of buying a triangle template, I could just make one out of cardboard.  So I did that.  Definitely nicked it many times but it was a free solution!

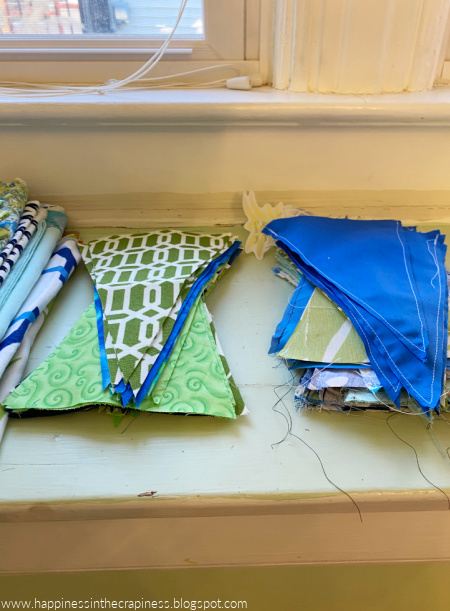
Once I had a sizable fabric stash, and had procrastinated starting for awhile, I got to cutting.  I used my rotary cutter, my cardboard guide, and a cutting mat.  (For reference, my triangle is 6 inches at the base and is 9 inches long) And a whole lot of fabric.  My finished pennant has 75 double sided flags which meant I cut out more than 150 of these (I miscalculated a bit how many I would need.)  So I cut and cut and cut.  Counted them.  Cut and cut and cut.  Made sure I had an even number of any fabric.  Cut and cut.  

Next up was ironing.  That was pretty straight forward and I did most of that during family movie night.  Sam wondered what the iron and ironing board was (there is a good chance that's the first time he's ever seen it in use) and Luke thought it was so fun and ironed a decent chunk of them for me (no fingers were burnt!).

Then it was pinning, pinned every single set together, the good sides in.  Pin, pin, pin.


Next was sewing them all together.  I did these in chunks, maybe 25-30 in a session.  I was working on this earlier this spring when we had the occasional nice day where we all wanted to be outside so I was doing this work around colder/rainy days and doing a lot of the tedious pinning and ironing during movie nights.  

Once they were sewn everything needed to be trimmed (for less bulk when flipped), turned right side out, and then ironed again.  I used an old letter opener from my parents' to help push that bottom tip out. 

These steps all sound easy, and they really were.  Just time consuming when there were 75 pennants to make!  I did some bouncing between steps based on keeping my hands busy during movie night (key to staying awake) and I obviously didn't want to be running my sewing machine then because nobody would be able to hear the movie!  So just managing steps to keep it moving. 

My ONLY purchase for this project was 3 rolls of white 1.5" Grograin ribbon from JoAnn.  I had decided to do mine in 3 segments because it just seemed easier to deal with than one long strand, also I didn't want to do the complicated math of figuring out where I should leave slightly larger gaps for the turns.  Plus, that way I wouldn't have to patch together any strands of ribbon. (I specifically remember rushing to pick up this order after the grocery store and then frantically getting home because the furnace guys were due any minute to give us an estimate on fixing/replacing (it ended up being replacing) our furnace...then they didn't show up for over an hour.)

Before I pinned the pennants to the ribbon I also ironed the ribbon in half so I would know where to pin the pennants.  Another movie night activity!

Once I had my initial set all cut, ironed, pinned, sewn, trimmed, flipped, and ironed, THEN I sorted them all into piles.  Solid blue, patterned blue, patterned blue & green, patterned green, and solid green.  I counted what I had of each so I could figure out how to spread out the different colors and patterns.  

Then, maybe the most fun part of this besides the hanging?  I started pinning.  It was a tiny bit anxiety inducing, trying to make sure I kept some semblance of order without it looking too orderly.  I hadn't specifically cut out an equal number of anything, just picked from what fabrics I had so I couldn't have done a perfect pattern anyways.  And I think it came out just right to look like a good variety but still casual.  I used a 2 inch spacing between my pennants. 

I started with my biggest segment, about 20 feet, so it would all be downhill from there.  Once it was all pinned I started sewing.  This sewing went very fast because it was just a straight line.  I had folded up the flags so that they unfolded perfectly as I ran them through the machine.  It was so satisfying to see it all come together! 

I sewed a loop on each end and then hung it up!  (And removed the pins!) Tightened my loops and then we were good!  This first piece was the easiest to hang too because we just used the nails that were still up from the balloons.  

Then I repeated the process on the other two, shorter pieces.  I ran into just two small (personal) problems.  I specifically laid out one pennant thinking it would go in the front part of the room and going off the colors of that one.  But miscalculated which pennant was which and it made me slightly displeased with how they came together but not enough to tear the whole thing apart!  (I just realized I could flip my longest piece and the colors would come out like I had planned...)


Then, when I was pinning the last pennant I realized I was going to be short.  Took some measurements and decided I was going to need 5 more sets of flags.  It was pretty demoralizing because, while the steps are easy there are just a lot of them and I thought I was almost done!  And I was frustrated that I had screwed up my math a bit.  So I went back, made 5 more, pinned them, sewed them, and then realized it was too long and had to cut 2 of them off.  *face palm* BUT, then it was done. 

(You can see in the background another 22 in 2022 project in process, which has also since been mostly completed!)

It took me tiny bit to get used to them hanging up, they are high enough, and we are short enough, that we don't hit our heads on them (even though I can reach them without standing on tiptoe).  They added some festiveness to our party AND they will be all ready to go next year!  With nothing in the trash other than some thread and fabric scraps!

A particular fun part for me is that, instead of a patchwork quilt, it's a bit of a patchwork pennant and I can trace many of the pieces to various project I've done in the past (my wristlet, tote bags, the kitchen valance, our bedroom bench cushion, the curtains in my office, book coverings, chairs from my grandparents, and more!)  I can point to so many pennants and tell you what I bought the fabric for (nobody cares to hear this, but I COULD tell you) and there are a lot of nice memories up there.  

This was a very satisfying project.  I got to use a lot of fabric with memories.  I got to sew again!  I made something to replace a disposable item!  And our house has had a festive air for weeks without having balloons deflate!  It was a bit time consuming, but not hard, and mostly enjoyable.  It was fun!

Thursday, February 17, 2022

How We Get Stuff Done

We're going to be completely honest here.  When I was pulling the looking back links for my January 2022 monthly recap, I was pretty impressed with us for all the projects we had gotten done in the past.  Some of that was just due to the timing of the posts.  Writing about an organizing project seems much more appropriate in January than in December.  I always appreciate having things organized but I am not going to find time between all the Christmas prep to tackle a big organizing project in December.  I am DEFINITELY interested in that content in January.

So many of those January posts were projects that were actually completed earlier but I just didn't post about them until January (like the basement pantry, my craft shelves, and the front room shelves).  I remember very clearly when all those projects were in the beginning stages and when in most cases, they were pain points in the flow of our house.  All my best organizing projects come from recognizing and doing something about pain points (and that pain points is most often "we need a specific spot for this category of items" such as extra bath towels or food).  

All the above mentioned projects happened before we doubled our kids, as in, got Sam almost 4 years ago.  That year before we got him we were SUPER productive: redoing our front room floors, repainting our bedroom including the trim (SO MANY HOURS on that trim), redoing our linen closet, my craft shelves, the front room shelves, I ran my half marathon, and Matt started on the swing set.  We have yet to replicate that kind of productivity. 

And, YET, when I look around our house, especially when we recently showed the boys pictures of our house as we first saw it 16 years ago, we've still gotten things done.  We are always working on SOME project, often many projects.  Many things can drive me a bit bonkers in a day but my motivation to get things done is almost always there, even when the to-dos can be part of what drives me crazy.  

It helps that I am highly motivated by crossing things off a good to-do list, in fact I keep MANY of them going at any given time.  And that motivation is the driving force behind everything we complete.  I live and die by my lists (and a good Excel spreadsheet).  Everything can be broken down into smaller steps that I then check through.  Small steps make big progress. So here's the short list of how we do it:

We make a list.

We break that up into smaller items on a list.

We spread out those tasks.

We get stuff done.

I wish I could say we have a master list somewhere of all the projects we want to get done.  We have had various versions of these over the years but not a current one right now.  I have a list on my phone with 3 to-dos on it, with the done items going back to 2013-ish.  I keep the list mainly because it's good to see all that we HAVE accomplished.  At least once a year we sit down to make a big to-do list of current projects, usually in the spring when all of a sudden a bunch of outside tasks need done too.  Then the list gets put away and months later I find it and am amazed that all of our past stresses are now done and we forgot about the pain points.  Or we've decided we don't really want to do them anyways.  Or we just admit defeat on organizing the garage.  (What is the timeline on getting rid of items that haven't been used?  Like, if say, someone had a particular tool in the garage that they hadn't used in 12 years despite having all the working parts and safety gear...that seems like something you could get rid of, right?)

Our main master to-do list right now is mostly my 22 in 2022 list.  I start accumulating items for that at least a month before I write the post and then add to it as stuff comes to mind.  I also have a running list of "100 dreams" on my phone that isn't yet 100 items and occasionally I will reference that when making my 22 in 2022 type lists but that's more bucket list travel type items (or owning a blue car type items, one I finally accomplished in 2020!)  and less home project items (although I believe the long simmering "put in a sandbox for the boys" is on there).  

When I lock in my 22 in 2022 list, I have a general quarter-ish idea of when I hope to accomplish all the items.  A few of them stretch across the whole year (like our dates, eating local, and food holidays).  Some are more specific like tie-dying that seems more summer friendly than winter.  

I've written about my monthly to-do lists before, although I've been keeping them in my bullet journal for awhile now.  On the 1st of each month I make a project list for that month.  I pull from my 22 in 2022 list, recurring items I hope to do every month, the number of miles I plan to run, my monthly movie watching schedule (something I should blog about), upcoming holidays/birthdays, and looking back at my past year's list for that month.  Once I write things on that list I want them crossed off.  That doesn't always happen but I always aim for 100%.  

It's not always big steps on my 22 in 2022 projects but often just baby steps to keep things moving along.  One of my 22 in 2022 projects is to redo the wall over the buffet so this month I want to buy one piece of art for it.  I've also been toying with the layout even though I don't have all the pieces but to give me an idea of what sizes/orientations I am shopping for.

Regular check-ins are KEY and I update my monthly bullet journal list (including my monthly reading plan and book tracker) every Monday, Wednesday, and Friday.  That is very frequently seeing what I still hope to get done in a month.  

The final to-do lists these items end up on is in my planner.  I am completely devoted to being a planner person now and I literally don't know how I would function without one.  There would be a lot of things slipping through the cracks!  At the beginning of a month I'll fill in my recurring tasks (including daily reading to the boys and Luke's nightly homework).  Then on Fridays I'll plan the following week, filling in my chores (I've rearranged the chores and assigned a few to Luke but the process is almost identical to this!), and adding items from my monthly projects lists as the days allow.  Sometimes, like mornings I work, I don't expect to get much done outside of normal tasks.  On afternoons my Mom comes to do homework with Luke I know I'll have a bit of time I can maybe photograph a project (with a Sam shadow) or maybe clean out a drawer or something.  So I slot in the monthly project to-dos around everything else, always knowing I want to completely check off my monthly and daily to-dos!  (And some months I get lucky/motivated and get more done than I had hoped to on my list.  But that's far from always.)

So items go from:

  • My brain
  • 22 in 2022 list
  • Monthly project lists
  • Weekly planner 

And then, somehow, they mostly get done!  I have yet to achieve that elusive 100% on an annual list but we are always creeping a bit closer!  And somehow, things continue to get done.  It's a lot of little steps, a lot of planning ahead, and just a heck of a lot of drive to check off my to-do lists.  Checking items off my to-do lists keeps me majorly in check!  Sometimes I get to check them off all 3 of my lists at once and it is EXTREMELY satisfying!

Thursday, February 10, 2022

Making Our Stair Travel Wall


One of the projects on my 21 in 2021 project list that I was most excited about was #7 "redo a gallery wall".  I had a few I was considering and knew I wanted to make ONE of them happen last year so I gave myself the smallest of leeway of said I'd do one of them.  (I also ended up tackling a big gallery wall in the boys' room which wasn't on the list but was added to my to do list when we rearranged their room for the bunk bed.  That was a really enjoyable project that helped me fulfill a creative itch I didn't even know I had.)

The second big gallery wall that I did after I started being interested in home decor, was this travel wall over our buffet in our front room.  That was almost 7 years ago, of 6 years before I actually started to dismantle that wall.  I really liked it still but we had been on too many vacations and there wasn't room for a picture from each up there.  (Or, a few pictures from each because I decided we needed to represent each of the 4 European countries we visited as well as both Hawaiian islands.)  We just out traveled that we had space for on that wall.  I was also just interested in something different in that spot since it's a large wall in our most seen room.  Something with more white space and maybe less of our faces.  

AND, I had also thought for many years that eventually I'd like to do a travel wall up the stairs, thinking we'd do that in our "next house".  Then I realized, there was NO reason why I couldn't do it in this house, especially since I never want to move. (I am sticking hard to that stance.)  SO, all things were pointing to this is the wall I should redo.  Then it just came to the process of actually doing it.

Last May, right before the end of school, I took down all the black frames and spray painted them white.  I didn't see a purpose in having that many extra black frames and I'd also need a whole bunch of white ones so it just seemed the easiest thing to do.  I also gathered up a variety of other similarly sized frames from around the house and added those to my frame pile.  

Then I did nothing with this project the whole summer.  It took me MONTHS to even take down all the command picture hanging strips that were remaining when I took down the frames.  I guess I wanted a safety net?  I don't know.  But the blank wall we've been living with for months sure looks nicer without those strips!

A week or two after school started again last fall I started laying out the new wall.  I knew before I started that this was going to be the most complicated gallery wall I had done.  Not only did I have a confined space but there was also the angle of the stairs to deal with.  My first attempted with tape measures and eyeballing the angle didn't go well.  It's hard!

There was also the small issue that I didn't even have enough frames yet and Target was absolutely refusing to put them on sale.  I watched those puppies ALL SUMMER and they were never on sale.  I was also very flexible on orientation of the pictures and sizes.  There were A LOT of variables.  I didn't really help myself when I bought some more prints from Etsy to fill in what I thought were gaps.  I definitely OVER COLLECTED art for this wall.  Luckily, I was able to fit all the little postcards I bought.  (London, Washington DC, Miami Beach, and Picture Rocks).  

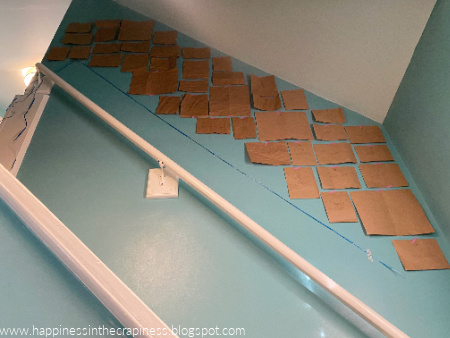
To help with my angle problem I got Matt to help me make a template for the area using my trusted kraft paper.  Having that set paper limit to my space really helped me finalize a layout, even if it still took me many more layout attempts and some hard editing to narrow down which pictures and sizes would make the wall.  

Part of the balancing was giving 8x10s to our bigger trips, making sure things went to close to chronological order, and trying to balance out the pictures with our faces vs. just scenery.  But I also had specific pictures from some trips that I wanted included and sometimes the trips with good family pictures were near each other.  It is, by far, the longest I have ever messed with a gallery wall.  SO. MANY. ATTEMPTS.

What finally helped me nail it down was, after making a lot of edits, making an arrangement that actually fit most things with room for some more trips and then I left it on the floor for over 24 hours.  Right in the middle of our front room.  Miraculously, no frames were stepped on and my arrangement mostly stayed as is!  Then I had some time to go through some final tweaks and also balance out the frames.  My original black, now spray-painted white, frames are chunkier than all the new Target frames I had been buying to fill in with.  So once I had my final arrangement I tried to balance those out, where there was space, so all the chunkier frames weren't at the bottom with the skinnier ones at the top. It's not perfect but it's balanced enough that it's not distracting to me!

THEN, it was time to get that sucker up on the wall.  I traced ALL THE FRAMES and noted what picture it was, it's orientation and marked where the nail would go.  I've been on this zero-waste kick since I did the boys' gallery wall with mostly command strips over the summer so it was back to all nails!  Once all the frames were traced I then started taping my guides up on the wall, 4-5 at a time.  I frequently ran back to the front room to check on placement as I got the guides on the wall.  The paper guides are a bit of a pain BUT I've never regretted doing them, after using them on every large gallery wall I've done in our house.  ESPECIALLY on this one, making sure I got the angles right on the stairs.  

It was still more than a week until I finally started to put holes in the wall.  I am not exaggerating when I say that this was the most time consuming gallery wall I've ever done, by far.  I was concerned that my frames were creeping close to the railing as they went up the stairs so I added a ribbon to keep the spacing close to the same, plenty of room for little boys to use the railing without knocking into a bunch of pictures.  

After ALL OF THAT.  So many layouts, paper guide, hanging them all up, checking my angles and spacing...I FINALLY started to hang frames and that probably took a good 2 hours!  I did all the holes except one, first drilling a hole and then pounding in a nail.  Not much makes me feel tougher than using a drill, even if it's just putting holes in the wall.  I hung frames gradually too, in bunches, as the nails were ready.  Even though I traced carefully, I didn't want to get too far and then find out my spacing was off when the actual frames went up.  

At this point I still had a picture order I was waiting to be delivered, hence the post-its on some frames.  I also knew I wanted to finalize the layout for the vacations not yet taken so I wasn't adding a frame every time we went on a trip and then realize that wasn't the best layout.  I actually just finished adding the final frames last week, since I kept buying them all up at my Target (I had shipped some to my earlier in the process and was disgusted with the quantity of packaging materials so I resolved to buy the rest in town as they were in stock).  

I filled my "to be filled" frames with just scrapbook paper so we aren't staring at the Target fake pictures for the next however many years it takes to fill these.  I have 11 open frames which I hope gets us at least 5-6 more years at least!  Then I don't know what I'm going to do.  I'll figure that out then!

This project was maybe the longest and most time consuming of any purely decorating project I've done.  (Does painting count as decorative?  Because painting all the trim in our bedroom white was probably even longer but that's not quite the same thing.)  It took A LOT of tries over MANY weeks to get it all figured out.  I started in May and finished the following JANUARY.  Few of my projects stretch out like that.  BUT, it was also, mostly, a delight to do.  I missed having so many of our travel pictures displayed and I enjoyed stretching my brain a bit to get it all figured out.  

(I'd also like to note that this was a VERY hard space to get pictures of.  The stairs are tight and it's pretty much impossible to get the whole thing in one single picture.  Also, trying to figure out what the heck counts as "straight" in these stairs was not easy.  You might be able to tell why they were a beast to drywall, it was something like 21 different surfaces.  That doesn't lend itself to easy picture taking.)


I've also learned that I like the mechanics of managing a project, even one like this.  Just keeping it moving and shopping for prints to include and picking our own personal photos to add for recent trips, all the tasks make the end project that much more enjoyable.  I wanted a travel gallery wall going up our stairs and now I finally have it!  It delights me the many times a day I am going up and down those stairs, to see the photo proof of previous adventures and our boys growing as we go.  

Next up, a few frames that used to hang in our stairs are moving to our bedroom (I even used paper guides for that even though it's just a 4 grid!) and then I am going to start working on what is going over the buffet, where many of these pictures once were.  It seems like it should be a piece of cake after dealing with the stairs!  


Thursday, September 16, 2021

Boys' Room v. 4.0

Our boys share a room.  A room they are, legally, allowed to share (it's 125 square feet, in Indiana you need 50 square feet per kid in a room).  It is, however, rather small (see: 125 square feet).  It spent many (7) years being a catch all room for us that was quickly transformed into a nursery when we got the call (and got home from New York) about Luke.  There have been many changes made in the 8½ years since, moving Luke out of his crib, adding Sam to the room, and, now, putting in a bunk bed.

Before the bunk bed went up!

Here's initial nursery "reveal" (I still remember taking this pictures during an evening storm).   Turning our old back door into a headboard for Luke's first big boy bed (this is in the attic now but he used it until the bunk bed went up!)  One of my favorite gallery walls over Luke's old bed that I was very sad to take down this summer. And contemplating adding to that gallery wall when we rearranged to add the crib.

Like all good home projects, we knew this one was coming for awhile, finally bit the bullet and ordered a bunk bed (this one from Wayfair), and then let it sit on the porch for 2ish months.  (Many thanks still to the mailman who saw me struggling to get the 125 lb box up our front stairs onto the porch and carried it for me!)  We waited forever for mattress pads to go on sale for Sam and then my sister so helpfully, maybe, helped us procure one with her "complete the registry" discount (me waiting for Target to put items on sale has slowed down MANY a project for me this year).

So for awhile we had a bunk bed AND a crib in the boys' little room, which always amazed people until I pointed out that the footprint for a bunk bed is essentially the same as a twin bed so really wasn't that much different than the 3 years we had Luke in a twin and Sam in a crib.

Anyways, in July the crib finally came down and the room was rearranged.  For the first time in his life, Luke's bed wasn't in the same nook where we put his crib when he was in the NICU and we were waiting to bring him home.  Yes, that did make me more emotional than it should have.   

Of course, the easiest part of this project was moving the furniture.  Doing that still left a pile of picture frames and art on their dresser, all of which "needed" new homes in their room.  I was very excited by the prospect of this project and also anxious to get the pile of art off their dresser (I didn't realize how much was on their walls until I took it all down). 

The biggest part was the large empty wall where my former favorite gallery wall was.  We had originally thought the bunk bed would go there but the dimensions just didn't work but didn't know that until I had taken all the frames and command strips down.  Which all worked out fine because I like the new one even better!   I knew I could pack A LOT of frames into this spot, give us room to showcase some of the boys' favorite things and some special family memories.

We started with laying out all the art that might go on the wall and then measuring out the not quite rectangle that was available to fill.  

Then I played with laying things out on the floor, taking into account the slope of the ceiling and the nightlight outlet.  I raided my decor cupboard for any unused frames and added those in too. Trying to space out the canvases and colored frames, even though some of those would be changing. 

Then it was making paper templates (with paper that had come as packing material in something) and taping all those up to the wall.  Adjusting a few as I went.  Spray painting a few frames to eliminate the orange (even though I ended up spray painting a different frame orange for Sam).  

Once I was happy with how it all looked I started hanging the ones I could with command strips.  About half of these came from the thrift store and some have a velvet-y back which I have learned doesn't hold command strips well.  Those I marked on the paper where a nail would go and Matt hung those for me later.  


I ordered one print on Etsy for this wall, updated a few of the pictures (initially I just filled a few with pictures I already had printed) and it was done!

That process actually took a good week, plus waiting for the printed items to come in the mail.  I was very excited and happy about the finished project.  It came out better than I expected!  It's my current favorite gallery wall of all that I've done.

A few other spots were easier to arrange but it took longer to get them done.  These Star War metal comic covers were the easiest, Command strip them up and DONE.


Then it was the spots by their beds.  Partially because Luke's birth stats stitchery had been there and worked when we rearranged but I decided to hang a few things at the foot of each of their beds (at least currently what is the foot end).  They each have their birth stats stitchery that my sister has made for all the grandkids (only 20+ of them) and then a family picture for each boy.  We went with what I had printed initially and Luke had no problem leaving his to just a picture of him, Matt, and myself when I offered to order him a new one that included his brother. (Then he saw that Sam got one from our cabin in Alabama that they loved so much and now he wants his to be from there as well.)  Luke also has various craft projects hanging up by his bed and we just ordered him a clip-on light for reading past bedtime. 

Luke had no preferences for what else I hung on his portion so I hung a canvas that he had painted 4ish years ago.  We had it and it fit the space!  Sam got a BB-8 picture that had been elsewhere but I spray painted a different frame orange for it.  He's more attached to the orange than BB-8.  And then Matt free drew a picture of a hammerhead shark because they are one of Sam's current favorite animals and then it got popped in another frame we had (and I had spray painted).  

Matt made white shelves back for Luke's initial nursery (there is another in the basement) and we have one hung for each boy over the dresser (which Matt also made) to display various sentimental things.  It all has to fit on the shelf! 

The mirror was mine as a kid and has been hanging there for awhile.  The picture of Jesus was also mine that I just pulled out of my special box when getting out my 1st Communion banner to hang for Luke's party in the spring.  I had been waiting the Samuel verse "For this child we have prayed" in their room for awhile, since we got our Samuel we prayed so hard for, and finally bought a print off Etsy to frame a few weeks ago.  The ottoman lives on from the original nursery and the blue bear my godmother made me when I was little!  

Under their bed there are 4 bins, two for each of them.  I ordered these (affiliate link) from Amazon (when they were cheaper than they show now) after Target no longer carries the ones I really wanted.  These are fine but they don't scoot real well on the carpet and they always look sloppy.  There were previously countless random boxes of Luke's & Sam's "treasures" under Luke's twin bed that I was not going to let stay with the higher bunk bed so these were the solution.  They each have stuffed animals in one and then the other is for "treasures".  All their random things they want to keep but I don't want to see laying all over the house.  It can be as messy as they want as long as it all fits.

Here's the nook that was formerly Luke's bed nook of 8 years.  The chair was from my paternal grandparents that Matt's sisters made a new slip cover for.  Matt built the bookshelf and my Grandpa made the nightstand in 1993 (which I know from the year he carved in the bottom, I almost cried when I saw that).  The pillow on the chair is one of these I made 8 years ago, just more stuffing and a new cover

Man, I didn't realize how many handmade and hand me down items are in their room until I started writing this post.  I'm rather proud of all that!  The Elmo was mine as a kid (ok, teen).  My sister made the crocheted red panda, lemur, and turtle.  Matt & the boys made the two carved animals (he says the dinosaur isn't any good and keeps wanting to get rid of it...I think he's crazy).

And to balance out all the homemade and hand me downs...book ledges from IKEA although the Mickey Mouse and his bed (and bedding) were mine as a kid too!   Besides the bunk bed and all of Sam's big kid bedding (pillow, mattress pad, etc.) I think I only bought the 4 under bed bins, 2 prints from Etsy, 2 picture frames, 1 can of spray paint, some command strips, and printed a few personal pictures.  Not too shabby!

And that's their newly finished, rearranged, and redecorated room!  Finding space for everything on the walls took quite a bit of time but it was a project that was really fun to take on.  Before I started the largest gallery wall it had been awhile since I did something creative like that and it was so energizing to do one again.  I felt great satisfaction in getting it finished and also motivated to keep working on the two other gallery walls I am working on redoing!  There is no motivation quite like finishing a project!