Showing posts with label house projects. Show all posts

Thursday, May 11, 2017

Floor Crush

Is that a weird thing to say?  It might be.  But it also might be true!

When we first went through our house over 11 years ago,  I remember remarking that the carpet in the front room looked a little worn.  Then when we were moving in about a month later one of my (almost) sister-in-laws pulled up a corner of our carpet to see what kind of floor we had underneath.  The gathered (almost) sister-in-laws declared it some beautiful hard wood.  At the time I wasn't into hardwood floors, having grown-up with a completely carpeted house.  The carpets stayed.


Fast forward 10 years, a whole bunch of episodes of House Hunters (where everyone drools over original hardwood floors), and one porch floor refinishing project later, and I was fully on team "we need to redo the original hardwood floors".

The carpet we thought was worn 11 years ago was extra worn now and we had been debating options for awhile (post here) but refinishing them was never one of them until we did the porch.  Then it quickly became the only one we were discussing.  It was a really good thing we went into the project with the intent to refinish them because if we had just been planning to throw down rugs on top of the floors as in...it wouldn't have been pretty.

I've written about how hard it was to start this project and how much the mess got to me but, really, in the grand scheme of house projects this was far from the worst.  Questions I now ask myself:

"Do I have to pee in a bucket?"
"Can I take a shower in my own house?"

If the answer to the first is NO and the second YES, then it's nothing THAT horrible and we just need to suck it up and keep working.  (Bathroom posts here, yes, I will be talking about that project forever.)  (I was texting one of my sisters while working on this floor project and she remarked that we are the only people she knows who would go without a toilet for 6 days just to save money and do everything ourselves.  I don't know if that makes us crazy or brave.)

Besides moving all the furniture out of the rooms, we also took everything off the walls because of the pending dust mess.  We've cleaned that up before and it's not fun.

Fact: there is no such thing as over dust-proofing your house.

That is one thing we've learned through multiple dirty projects (tearing out plaster, sanding drywall).

Anyways, furniture was all moved and then we started tearing up carpet and padding.  When I say all the furniture was moved I mean everything but the tv and stand because we needed something to do while doing all this manual labor.  Priorities.

Carpet and padding coming out

Matt had measured the height of our trash can, approximately 3 feet, and we cut all the carpet and padding into pieces that wide so we won't have to pay for a dumpster, just very slowly fill our trash can.  That also means we have a whole bunch of rolls of carpet and padding in our garage for the next...at least 6 weeks.  Anything to save a buck...  (Luke has suggested MANY times that we just put all the carpet back.  He was strangely attached to it.)

Carpet out! Staples everywhere
Then it was tearing out a whole bunch of staples (where the tv in the room really came in handy because tearing out approximately 1000 staples gets tedious FAST).  Then tearing out tack strips.  It was a strange sort of stress relief, until I gave myself a blister on the palm of my hand.  But I was still kinda excited I did it.

Staples and tack strips gone too!
Then it was onto the dust protecting.  We covered the entrance to my office with plastic sheeting and double layered painting tape.  We were storing a whole lot of stuff in there we didn't want to clean!

I taped around the front door to the porch.


We covered the doorway to the kitchen with plastic sheeting and then added a stick-on zipper so we could (somewhat) easily go in and out.

We taped over all the outlets and light switches.  We removed vent covers and taped over the exposed ducts.

Basically, we did a lot of taping and plastic sheeting and you know what?  It all worked rather well.  Other than just inside the kitchen door (where the sheeting came loose from so many ins and outs), the rest of the house stayed dust-free which was super exciting.

House dust-proofed, sanding about to begin

Early on the morning of sanding, which had been marked on the calendar for over a month, Matt went to Home Depot and rented an orbital sander.  He started with that while I did important things like wrap our godson's birthday present and hid in our closet reading a book on my phone while Luke watched his Saturday morning cartoons on our bed (where the tv was moved before the final dust-proofing, although Luke did offer to let us put it in his room.  An offer we didn't take for many reasons.).

During quiet time I went to help Matt with the floors.  It wasn't going well.  A few days earlier he had shown me how he wanted all the staples gently removed as to not scrape the floors (something I followed for about 5 staples and then a little more digging was required).  Fast forward a bit and I was using a flat screwdriver to hack at the decades of accumulated gunk on the floor.

Sanding day

He ended up exchanging the orbital sander for a tougher drum sander which worked SO MUCH BETTER for all the stuff he had to sand through (He said "if you tell people about this, make sure you mention the drum sander").  He said most houses would probably be ok with the orbital sander but we could see evidence of many different layers of stain, poly, rug adhesive, and who knows what else on our floors.  They needed something extra tough.

We took a break to go to Mass where Matt was finishing his usher responsibility.  Went home for supper, I put Luke down (maybe fell asleep a little after my tough day of hiding my reading habits from my husband) and then it was back to the floor.  I mainly helped sweep up dust and move things (trash can, broom, power cord) out of Matt's way.  We finished at 11pm after starting about 7am.  With a 2 hour break for church.  It was a really long day (I mean, mostly for Matt but I was exhausted after my 2 hours of late night work).

We spent the next two evenings finishing up the sanding.  We used palm sanders to get the edges where the drum sander couldn't.  It was exhausting and dirty.  On the second night Matt was finishing up in his office while I went through massive cleaning.  Swiffering the ceiling (a first!), cleaning fans, crown molding, walls, trim, floors.  The rented sanders had dust collectors which worked pretty well but the palm sanders had left a decent amount behind.  It was three "work until at least 11" nights in a row.

BUT we were left with these beauts:

Time stamp on this picture: 11:17pm

Just like with the porch, we decided not to stain them, just went for sealing.  We used this:


At the recommendation of one of Matt's sisters.  It doesn't require sanding between coats, can be recoated after 2 hours, and walked on after 24.  That's a fairly quick process.

We spent a day applying 4 coats, using something sort like a swiffer and dipping it into a paint tray.  At almost 500 square feet of floor we used over 2 gallons.

Then, we got this:

So many heart eyes.  SO MANY.

We kept peeking at them throughout the day of drying.  Luke came down for breakfast and told me "I really like the floors you made, Mom!"

Yes, I will take all the credit for them, thank you, son.

As I write this we are still in the "don't put any furniture back for a week" stage and I haven't been in my office for more than 2 days.  We are shopping for rugs online (WHY is it so hard!) and still need to pick out a couch (maybe before we hit 3 months without one?).  BUT, we are through the worst of it.

Over the course of 7 days we probably put in 60 hours of work.  This project was not easy and we still have the challenge of putting EVERYTHING back from all the random places it was stashed (so much just "stick this wherever I can find a spot" at the end) but I am SO EXCITED we took on this project and even more so when we get the house back.

Having the house torn up, not easy, not at all.  But for two weeks, less than $400 (before rugs), and these gorgeous floors?  I can live with that.


If you need me I'll be staring all moony eyed at my floors.  They were worth it.

Wednesday, September 24, 2014

Putting the finishing touches on the bathroom

Despite the general crapiness of the bathroom project there were a lot of exciting moments, like having a working toilet, using the shower for the first (and second, and third, etc.) time, brushing our teeth in there after 2 months, getting to organize the vanity and medicine cupboards.  I was really excited about that last one, really all of them, but that last one was a different kind of exciting.

When I last wrote about the bathroom a month ago we were down to just a few to-dos.  With everything else that had been done in there it seemed like it would be nothing to check off those last few things.   Well, you kinda lose motivation after hundreds of hours of work but we have checked off a few things.  Matt removed the door, completely sanded it down and repainted it.  The laundry chute still doesn't have a door but it's also super out of the way so not a big deal.

I've been working on filling the shelves which I have found incredibly fun.  While supervising Luke's bath time I frequently am moving things around centimeters here and there.  Matt calls this crazy, I call it fun.  I have finally settled on an arrangement I am happy with (for now, certainly subject to change). 

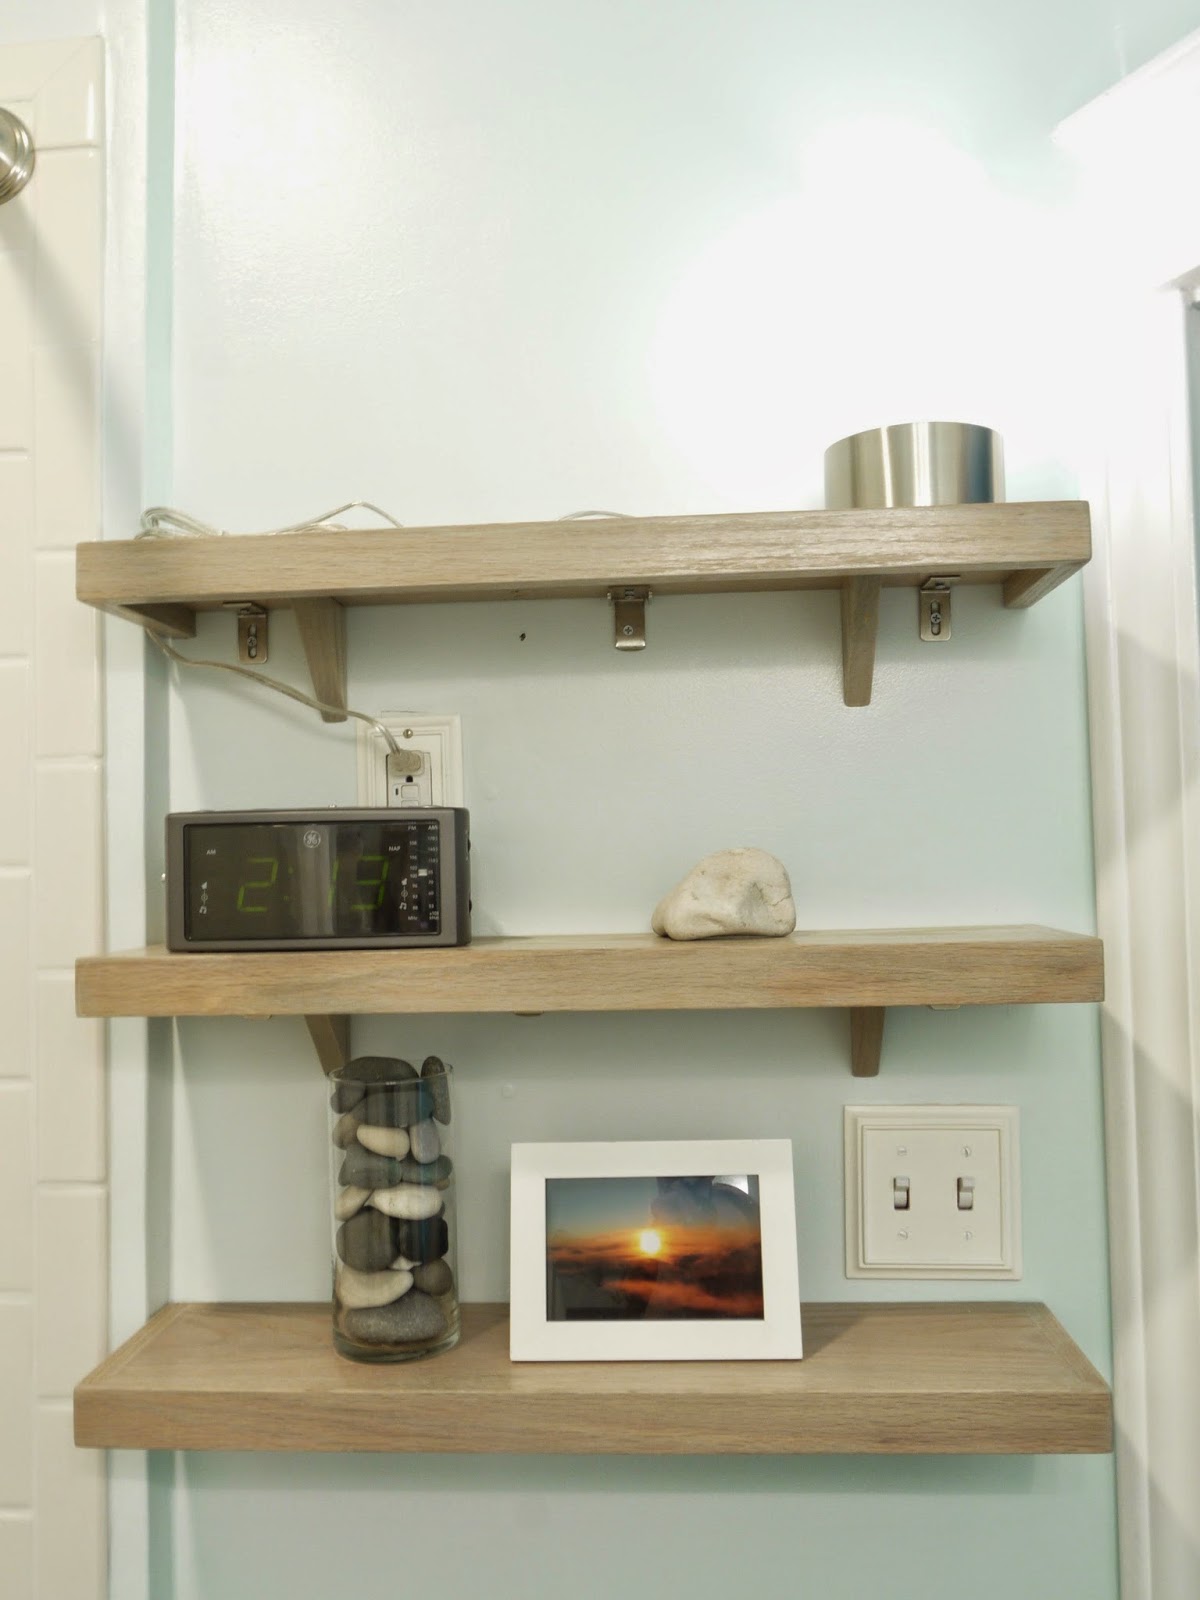
This is a hard place to photograph with the vanity lights reflecting, plus it's a super small space.  Unlike most of my little decorating rearranging, most of these items were bought specifically for the bathroom.  Prior to this project we owned the rolled white towels, the clock radio, the white frame on the bottom shelf (with a new picture), and the blue jar of cotton balls on the toilet.  The rest of the items came from Target (duh), Jo-Anns, TJ Maxx, Lowes, and Hobby Lobby.  Oh and Walmart for the candle in the blue/green lantern and the rock on the bottom shelf we picked up in Michigan.  And the ginger ale bottle originally contained ginger ale from our local meat market.


It's a mix of blue green, white, and grey with a lot of beachy items, but a sophisticated beachy.  A friend described it as "very Young House Love" which I took as a huge compliment. 


We also hung some IKEA frames to the left of the vanity.  While getting up to use the bathroom in the middle of the night a few weeks ago (I think I have some of my best ideas while half asleep), I decided I wanted to hang some of our vacation sunrise/sunset pictures there but it took me awhile to decide exactly what kinda of frames I wanted to use.  Narrowing it down to just 6 from our 1200+ options (seriously, we have that many sunrise or sunset pictures) took a little time.  There are 3 from the lake, 2 from Maui, and one from our Michigan trip.


Beautiful sites to see first things in the morning. 
 
While hanging these frames, we also added one to the exact other side of the wall, in the stairs.  Formerly it was just Luke's picture but now we added our free picture from the church directory.


These are also the walls that I wrote on when doing our stair project and the bathroom, as directly back to back as I could figure. 


Crazy to think how many years it could be before anyone sees those again.

So, another part of the bathroom project is done, and just in time for my invalid period to start!  It was a really busy few weeks leading up to surgery but also so nice to finish up many little projects.  And so so nice to be at the tail end of the bathroom work.  I am still amazed at what Matt accomplished in there.

Wednesday, August 13, 2014

The bathroom is done!!!! (basically)

 If you are one of my Facebook friends then you may have seen this picture I posted last week:

That's the original bathroom on the left, at it's worst on demo day in May, and the mostly finished bathroom on the right.  All three pictures are taken of the same corner in approximately the same spot.  You can see where the window is (left), where it was (middle), and the inset with the bottles is in part of the old window hole (right).

The transformation is a little mind blowing.  Not just from what we lived with for 8 years but also from the various in progress shots from the last 12 weeks.  I never actually saw it looking like it did in the middle but I still saw plenty of disasters in there since.  Hard to believe we lived with the open insulation, plywood, bucket toilet for what felt like forever and now we have a beautiful bathroom.

Vanity & sink area
The tub/shower.  You can't see the laundry cute but it's under the back shelf in the shower.  So handy.

It's still a small space, about 6'x6'.  We didn't expand but did gain a better layout.  The maybe 2 square foot corner where the laundry hamper was is now part of the main space which is a huge difference.  We lost that little part wall which added a little space.  We couldn't fit in a double sink but we have a giant sink with two faucets and that's pretty amazing! (We don't have to go back and forth on water temperature if I'm washing my face and Matt's brushing his teeth! Or we can easily both brush our teeth at the same time!).  The only thing better about the old bathroom was the placement of the toilet paper but I can definitely deal with that.

I don't know that I can even recap all that we (Matt) did in there but here's my attempt:
-tore out the window and replaced boards on the outside of the house to match, caulked, and painted
-tore out the entire existing bathroom including tub, toilet, vanity, tile floor, drywall, and insulation
-replaced some of the original subfloor and added a whole new layer of subfloor to give the eventual stone floor a good base
-replaced some of the studs, replaced all the insulation
-completely we did all the plumbing since all fixtures were moving
-completely rewired all the electrical since all outlets, switches, and lights were moving
-placed new tub
-built shelf for the back of the tub, including spot for laundry chute and a cupboard below
-built shelf into the wall, where the window was
-hung drywall/cement board on all walls and ceiling
-laid stone floor, grouted, sealed
-installed new toilet in new location
-tiled the shower, grouted and sealed
-mudded, taped, and sanded the ceiling & walls
-primed walls, painted the ceiling and upper one color and the lower part another.  Changed minds on lower paint color and repainted.
-installed mirrored medicine cabinets
-put in new baseboards and the trim on the upper part of the wall
-put in new light over the sink
-installed new vanity
-added new towel hook
-put a new transition between the landing carpet & the bathroom stone floor
-added shelves above the toilet

All that took Matt a few hundred hours.  It consumed much of May & June.  We had multiple family members lend us labor which was incredibly helpful, especially for things we needed more than 2 hands on (like hanging ceiling drywall) or things Matt had never done before (like installing the stone floor).  I'm really proud of all that he did and worked and figured out how to do (first time really tiling was during the shower surround!).  
  
What's left to do:
Matt
-add tiled back splash around the sink
-sand down main door and repaint white
-door for laundry chute (the hole is so small, there is no danger of Luke falling down it, he could drop stuff but he's not in the bathroom enough for that to be a concern.)
-door for cabinet below laundry chute (where we have our dirty bathroom things like the toilet cleaner & brush.  So far Luke hasn't found it.)

Diana
-fill & style the shelves above the toilet (was working on that earlier today)
-add some art on the wall to the left of the sink

Shelves over the toilet that need filled.  The thing on the top that looks like a roll of shiny tape is actually a touch lamp we use as a nightlight in there.
I feel like I should mention some of our inspiration/sources.  Most of the bathroom isn't too remarkable but a few things...
-The vanity is from IKEA, the Godmorgon/Braviken in high gloss grey (we got Matt's nephew to pick that up for us).  I LOVE it. 
-The green pebble flooring is from The Tile Shop.
-We got the inspiration for the vertical shower tiles with the dark corner accent from The Tile Shop, mainly here and here.  We checked out their local store 16 days after it opened.  Although the grey tile is from Lowes and the white subway tile is from Menards (but sold many places). 
-The dropped ceiling color accent inspiration is from Young House Love
-This was the basic color scheme we followed although using blue and grey and green (the colors of the sea in Sarah, Plain and Tall) is nothing new in our house. 

After talking about this project for so long it's a little crazy that it's almost done!  Time went fast but then I think back to May...Luke really started walking on his own the same weekend the old bathroom came out.  That's makes it feel like a long time ago!  Hard to put into words how much we love it and how proud I am of Matt for taking this on.  It's incredibly fulfilling to see something we've been planning for 8+ years and working on for 3 months come together so perfectly. 

Wednesday, July 30, 2014

Small bathroom update

A few weeks ago I posted that I had hoped to do a full bathroom reveal soon. ........ Well we are still working on it.  Turns out our motivation almost completely disappeared once the vanity went in more than 2 weeks ago.  We've still be working on it almost nightly but it's much slower (as in, less insane).  It is fully functional and we are down to just the following:

-finish transition from the landing carpet to the stone bathroom floor (Matt's working on)
-build shelves over the toilet (hope to be done by the end of the weekend)
-finish the laundry chute & small cupboard under the shower shelf
-tile back splash around the sink
-finish cleaning up the basement (major progress on that this week, Matt just needs to sort through tools and all the extra supplies)
-finish cleaning the garage

A few things that are currently in the bathroom:


As it is, I love it.  We've both said we don't ever want to leave this house now because we never want to leave the bathroom.  =)

Friday, July 4, 2014

Bathroom update: WE HAVE A SHOWER

Happy 4th of July!  To celebrate we have have declared independence from using other people's showers.  (Pushing it to connect today and our bathroom project??)  That's right, after 6 1/2 weeks we have a functioning shower.  It feels pretty fancy being able to shower in our own house again.  

bathroom is too small to get a good picture so if you want the full effect you'll have to come see it in person.  Preferably with your own sanding tools, thank you.
The tiling process was pretty horrible (and I didn't do much of it).  It took Matt 4 evenings to get it all the tile up. He finished last Thursday and then let it sit while we went to the lake for the weekend (he had earned a break after all the tiling stress).  Sunday night we grouted and that actually wasn't too bad.  I even helped once Luke was in bed.  Matt did the grouting and I helped sponge it off which I thought was fun because it was basically cleaning. 

grouted on the right, waiting on the left

ohhhhhh pretty
The grout had to dry for 24 hours and then Matt applied a sealer on Monday night.  So Tuesday night he took the inaugural shower.  Luke is also back to bathing in his tub in the tub which might save our basement carpet (or it might be too wet to ever be saved).  He even seems fascinated by the new shower because every time he bathes he's petting the tile.  He's more interested in that than his bath toys! 


We've been mudding and sanding this week since the tile is done.  I don't mind mudding but the sanding inbetween sucks.  Basically we'll get to a point where we'll just give up.  We could go 8 rounds and it still wouldn't look perfect.  I don't know when we'll reach that point.  We finally bought paint and I am optimistic that we could start on that within a week.  That would be amazing!!  Once the walls are done the toilet bowl can go in, I get the diaper sprayer back, the vanity will go in, and the mirrors up.  After that it's just finishing touches and our house will go back to normal!  I might be as excited to clean up all the messes as I am to have a fully functioning bathroom.
Partially mudded bathroom walls

Kinda looks like they have the chicken pox
I had hoped we'd be done by my birthday at the end of July and it's looking very good that that will happen.  After 8+ years of planning and dreading this project it's amazing to finally have the end in sight.  And take a shower.  Oh....showering.  I feel so fancy.

Thursday, June 26, 2014

Bathroom update: we have tile in the shower

We were on vacation most of last week so there was nothing happening in the bathroom for almost 6 days.  We got home at 3 on Friday.  Matt helped unload the car, ate lunch, and by 4 he was working on the bathroom.  Between Friday afternoon/evening and Saturday (post Color Me Rad) he got the rest of the walls up.
filling the seams of the cement board before tiling
 

Sunday he tested the water connections to make sure they worked before they were harder to get to (they worked, yay!) and then the tiling starting.  Tiling never seemed that bad before, just stick them up there, right?  Yeah...just watching Matt it looks horrible.  There is a lot of measuring, cutting, and lining up involved.  He's using spacers to keep the gaps the same.  He has to work fairly quickly before the mortar dries.  It's a pretty stressful process.  I've helped were I can but it's mostly him.  I think they floor seemed a lot easier in comparison because there was no cutting and imperfection is part of it's charm.

If everything continues to run smoothly we should be showering in our house in about a week.  That'll be 6 weeks since we last did that. 

After this is mudding and sanding the drywall walls.  I realized if you've never had the pleasure of drywalling you might not know what that means.  We hung 4'x8' sheets of drywall in the bathroom.  The seams and nail holes have to be "mudded" with something similar to the putty used to fill nail holes in a wall.  We buy ours pre-mixed because we're a little lazy.  You mud everything, wait for it to dry, then sand it down and mud again. Then sand and mud and repeat until you regret ever taking on a drywall project and your house is covered with dust.  The goal is to make it all look seamless (as most walls in your house probably do).  It's easy to do but very hard to do well.  I've only done this a few times (at the lake and on our stair project).

It's not fun but compared to all the other things Matt's tackled in the bathroom (redoing all the plumbing and electrical, tiling the floor and surround) this seems pretty easy since we know how to do it.  Not looking forward to it but at least it's a much smaller space than the stairs so hopefully it's not horrible.

Then we finally get to the fun stuff like painting, trim, figuring out the floating shelves.  I'm really excited to see it all come together.  For so long it's seemed so far away but now it's not!  We could actually be painting before too long!! 

Tuesday, June 17, 2014

Bathroom update: shower walls going up

Due to various circumstances Matt got less time to work in the bathroom this week but the progress he made the week before (floor, tub, walls) feels like it put us over a hump, like real progress is happening.  He spent a lot of time working on the plumbing which is now mostly done (I could post pictures of all the pipes in the basement but I'm guessing it wouldn't make much more sense to you as it does to me).  The vanity won't be installed until we are done mudding/sanding/painting the walls but it should be pretty easy.  Same with the shower controls and faucets, those won't go in until that wall is filled with insulation and then cement board hung.
plumbing ready for the sink
plumbing ready for shower

Matt has started hanging cement board around the shower.  The tile surround will go on this.  He worked on the shelf in the back of the shower and the shelf built between the studs. 


There is a piece of plywood over the tub for a better workspace.  
We are finally looking at a functional shower before too long.  It's been 4 weeks since we've showered in our own house so that shower really can't come soon enough!!  Here's what we're looking at to shower:

-finishing hanging cement board
-tile & grout
-put up shower curtain

That's it!!  Maybe with another week of work it'll happen.  It's really hard to believe we are almost to that point, huge step!!  Once the shower is done we have some more drywall to hang (about 6 inches between the first boards we hung and the ceiling) and then mudding & sanding forever.  Prime & paint.  Put toilet tank on and get it all hooked up (we'll get our diaper sprayer back!).  Install medicine cabinets, install vanity.  Figure out open shelves for over the toilet.  Done???  Compared to all the things Matt already has done these steps don't seem so bad, especially because I'll be able to help with mudding, sanding, and painting.

Still on track for our original end of July estimate.  I really think it's possible besides maybe some finishing touches!  It seems weird to think that someday this bathroom work will stop since it's been such a huge part of our lives for over a month and even the years earlier when we'd talk, plan, and dread it. 

Wednesday, June 11, 2014

Bathroom update: tub, walls, and floor!!


Ready to have your mind blown by some bathroom progress?  Despite fewer work hours in the past week there is more visible progress.  We now have a tub:


Some (non-mudded & painted) walls:


And a floor:


The tub went in about midnight last Tuesday which was after I had scheduled the last bathroom update post but before it was published.  But then it came back out again Wednesday and went back in again anyways.  I helped Matt move it out Wednesday evening before I went to shower at my sister's.  When I got home the tub was back in place.  I asked Matt how the heck he got it in there by himself. "With a lot of cussing.".  The tub isn't super heavy but it was incredibly awkward to maneuver, even with two of us.   It's now been caulked into place.

The walls went up on Thursday evening, again finishing around midnight.  I helped with some measurements and the hanging but Matt did all the cutting which is really the toughest part.

I mentioned some issues finding floor we liked and our small bathroom size did pay off.  We got these sliced green pebbles from The Tile Shop and are pretty excited about how it looks.  Matt & one of my BILs laid it Friday afternoon.  We worked getting the floor in around a lake trip since putting the floor down meant taking the toilet out and a lot of waiting for the floor to dry (which meant no bathroom work could be done).  So they laid it Friday afternoon.  The nice thing about these pebbles is that they didn't need any cutting.  They came on 12"x12" sheets but the pebbles could be pulled off easily when they had to work around the toilet or sink holes.  They broke a few pebbles to fit odd spots but really fairly easy floor laying (or so it appeared...I was on Luke duty)
 
floor pre-grout

Matt came home from the lake on Saturday to go to Mass and then grout the floor (had to be 24 hours after it was laid).  He was gone 8 hours to do those things.  This was also his first time laying tile or grouting (it was a horrible day for him).  We were back on Sunday shortly after the 16 hour grout waiting time was up.
pre & post grout comparison

At this point Matt decided he needed to grout again because he was running low the day before and then it dried even lower (this is the shopping trip he took Luke on).  He grouted again on Sunday afternoon which is why we ended up toiletless another 3 days (although we were gone 2 of those).  We now have a toilet and it shouldn't be out again.  There is no tank on it though since we'll be mudding, sanding, priming, and painting behind it.

The floor still needs a sealer coat but that can't go on until 72 hour after the grout has dried so hopefully later this week.  It's only 8 hour dry time (I think) so Matt can apply before bed and it will be ready by morning (and maybe we'll get close to 8 hours of sleep for once).

Besides that, Matt is working on plumbing.  He has all the sewer lines in - for the toilet, tub, and sink.  He's working on the shower shelf and then water in lines.  We still have to hang the cement board for the shower surround, get those prepped, and tiled before we can take showers but that doesn't seem incredibly far off.   The mudding, sanding, painting, and finishing touches seem like easy work once we can shower in our own house again.

The progress we (Matt) made this past week was huge.  It finally is starting to feel like a bathroom and less like a construction zone.  Every time I walk past I admire our pebble floor which turned out even better than I had hoped.  There is still so much work to be done but we've come a long way in 3 1/2 weeks considering Matt's still working full-time and I'm not much help with Luke.

Wednesday, June 4, 2014

Bathroom update: ceiling, laundry chute, and insulation

If you were to have come to our house a week ago and then again this week you would probably think not much progress has been made in the bathroom.  There is still no tub, no tile, no walls.  But progress is being made, Matt is putting in crazy hours working in there, probably 24 on just Saturday and Sunday alone.  It's basically all he does besides eat, sleep, and work.  Maybe a little time with Luke in there.  Luke gets really excited for Daddy time and isn't happy when he's stuck back with me while Matt works.

Things that have gotten done in the last week:
-electrical might (fingers crossed, knock on wood) FINALLY be done.  That took a week alone.
-ceiling is up but not mudded or sanded yet
-Matt's been working on the shelf that will be in the extra space next to the tub.  We bought a shorter than standard tub (turns out our last tub was short too) so we'd have a few extra inches for this.
-insulation has been replaced on the wall across from the toilet
-holes are drilled in the floor for the plumbing
-Matt did spacers on the mudroom wall where the tub plumbing will run so we can put more insulation in hopes of preventing the pipes from freezing
-working on getting a laundry chute put in under the shower shelf which will go directly to the basement.  It'll have a little door to pull open and drop stuff in.  This is something we debated about for awhile and didn't settle on until recently.  Pretty excited for less to carry to the basement on laundry days!

We also got the garage cleaned up enough to fit one car in which is one more than we've had in there the last 2+ weeks.  That's pretty exciting.  We've stuffed our trash bin the past 2 weeks with old insulation and lats.  I'm vacuuming almost daily to clean up the construction mess that is tracked all over the house.  We might be close to having a tub installed (no surround) so we might be able to take baths at home before too long.  This is incredibly exciting. 

Up next is finishing the tub shelf and working on the sink & tub plumbing.  Maybe getting drywall up before too long too.  We have, probably overly ambitious, plans to be tiling, both floor and shower surround, before too long.  Exciting to think about being to that point but as we've learned so far, every little step takes forever.  Even after we are back to a functional point (working shower, sink/vanity installed, toilet actually flushes) there will still be plenty of work to do like painting, adding shelves, etc.  But focusing on the functional part for now. =)

Yes, this project sucks.  Living without a shower is both as bad and not as bad as it sounds.  If I heard someone else was doing this I would think they were crazy and say I could never handle it myself.  But we've had this project in mind since we first saw the bathroom.  We prepared ourselves mentally.  There are parts that suck a lot but we've managed.  It's like having one car, we manged and then when we got two we remembered how nice it was to have two.  Someday it'll all be worth it.  I went in not expecting this to be done until the end of July so I'm not freaking out yet.  I don't know what I'm looking forward to more: having a finished bathroom or having my husband back.  It will be wonderful when that day comes.